Tips & tricks · Gear · Everywhere · backs free of evening pain · 3 min read
Set up your chair in a minute: elbows, knees, feet
Last reviewed:
In this article
An office chair has levers most people have never touched — they sit in it however it was set when unboxed, or however the previous owner left it. Yet the wrong chair height is a quiet source of lower back, shoulder, and wrist pain: you either hunch down toward the keyboard, hike your shoulders up, or your feet dangle. Getting it right isn't a job for physical therapists — it's three checkpoints you can fix in a minute and verify in ten seconds.
How to do it
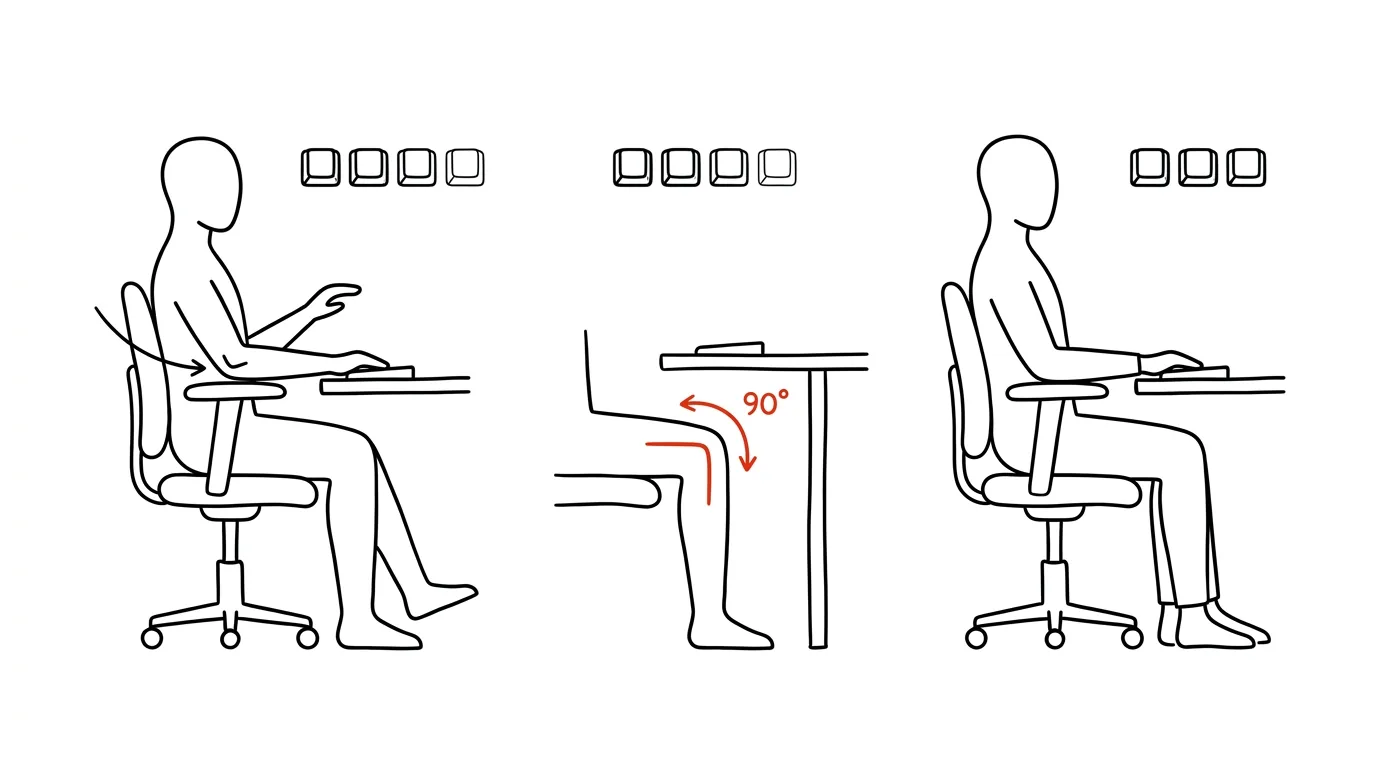
- Elbows: sit at your desk with your arms relaxed at your sides, forearms resting on the surface. Your elbows should form roughly a right angle, with your shoulders dropped, not hunched up toward your ears. If your shoulders are raised, the chair is too low; if you're leaning down to the desk, it's too high. Since most desks aren't height-adjustable, elbow position gets tuned via chair height instead.
- Feet: they need to sit flat on the floor. If they're dangling after you've adjusted your elbows, don't lower the chair — prop your feet up instead (a footrest, a box, a thick book). Dangling feet press the front edge of the seat into your thighs and push you to slide forward.
- Knees: roughly a right angle, hips slightly higher than knees. There should be about a palm's width of space between the front edge of the seat and the back of your knees.
- If the chair has lumbar support, slide it into the curve of your lower back — it should support your back, not push into it. And actually use the backrest: perching on the front edge with no support tires your back fastest.
- A quick check any time later: shoulders down? feet on the floor? forearms level? Three questions, ten seconds.
That covers the bottom half of your workstation. The top half — monitor height — is handled by the tip top edge of the monitor at eye level; the two setups complement each other, and one without the other falls short.
A typical scenario
An accountant working from home complained of pain between her shoulder blades and tingling in her fingers. An ergonomics check that took a minute revealed the classic setup: chair too low, shoulders hiked up all day, wrists bent upward. After raising the seat two inches and propping up her feet, the pain faded within a couple of weeks — no new chair, no physical therapy, just correctly using levers that had been there the whole time.
What you get out of it
Less fatigue and less pain for zero investment — you're just adjusting what you already own. You'll feel the effect within days, because your body stops spending hours compensating for bad geometry. And once you've learned the one-minute check, it applies to every chair you'll ever sit in: at the office, working from home, or at a cabin.
Pro tip
Set armrests so your relaxed, dropped elbows just barely touch them. If they're too high, they push your shoulders up; if they get in the way of pulling the chair up to the desk, it's better to lower them or remove them entirely — the desk surface will support your forearms instead, which is perfectly fine.
Want to go deeper? The handbook has a whole chapter on it — The complete guide to an effective home office.
Similar tips
Copying formatting: Ctrl+Shift+C and V
Ctrl+Shift+C
The format painter has a keyboard version — copy the look of one element and stamp it onto the next.
The Selection Pane: click an object hidden under everything else
Can't grab an object buried under an image with your mouse? The Selection Pane lists every element on the slide — pick by clicking in the list, not by hunting on the canvas.
Slide Master: change the font everywhere at once
View → Slide Master controls the look of the whole presentation from one place — fonts, colors, logos.
Was this helpful?
Liked this tip?
I send one like it every week by email. Two minutes to read, hours saved.
The Top 30 tips e-book, free — it lands in your inbox right away.
Then 1 tip a week · no spam · unsubscribe in one click
Prefer a system to single tips? The free email course — seven days, seven emails, one skill a day.