Tips & tricks · AI · Everywhere · ~weeks of designer and agency work · 78 min read · in-depth guide, doing it ~3 h
Your brand as a system: from brand voice through brochure and website to CRM
Last reviewed:
In this article
- Glossary of terms
- A typical scenario
- Before you start: accounts, installation, and first launch
- Phase 1: the brand voice document — from a desk drawer to a lasting asset
- Phase 2: a print-ready brochure through Claude Cowork and Affinity
- Phase 3: brand voice on GitHub — the single source of truth
- Phase 4: a company website that reads brand voice from the repository
- Phase 5: an internal CRM on Supabase
- Marta three months later
- How much time to set aside
- How much it costs: real numbers
- Why not “just generate it in a chat window”
- Alternatives to Affinity
- Security across the whole process
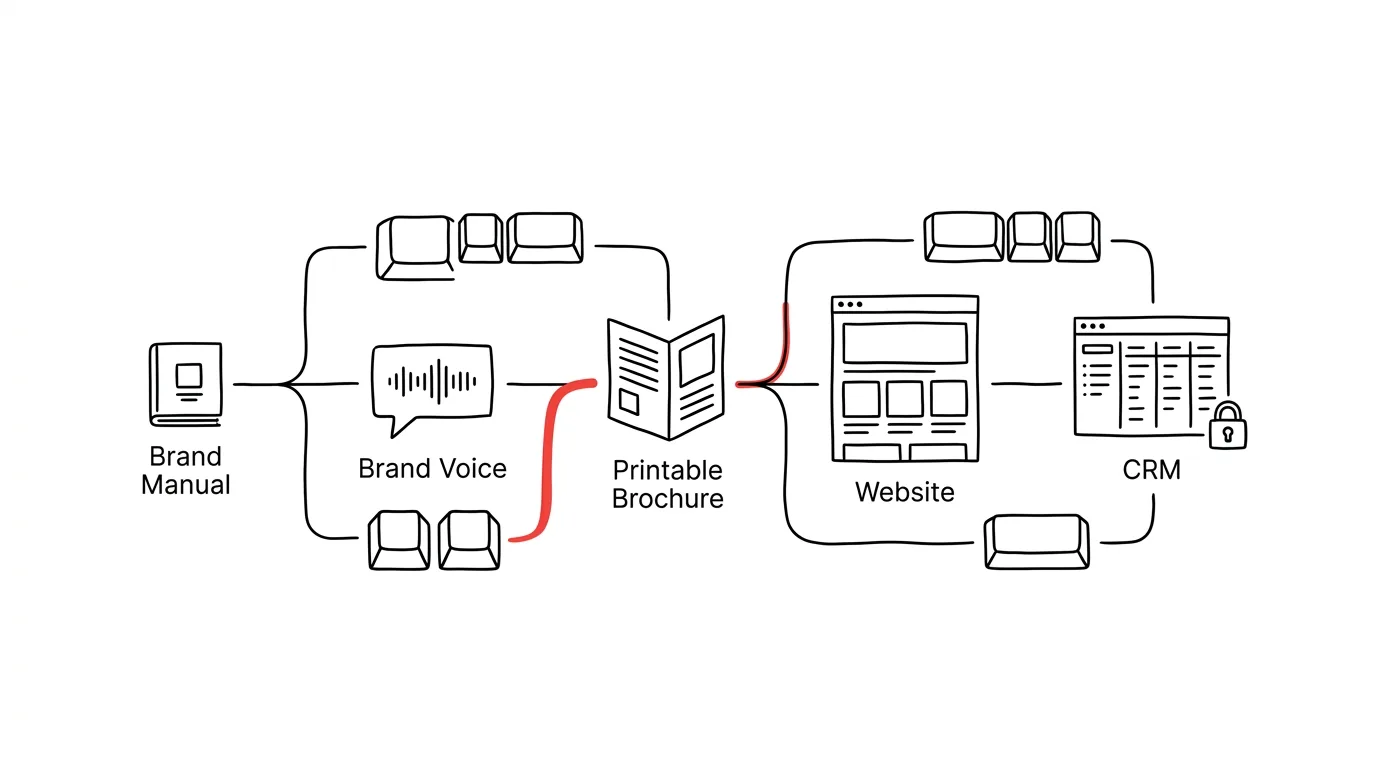
- The whole process on one screen
- Common mistakes
- What you get out of it
- Pro tip
Most small companies have their brand scattered across drives: a brand manual in a PDF from a studio they no longer work with, a price list in Excel with three different versions, website copy written by three people in three different tones, and photos “somewhere in a folder.” When a brochure is needed, someone orders it from a designer and waits; when a sentence on the website needs to change, someone emails the agency. And when someone tries a shortcut and has a chat tool generate the material instead, they get a nice-looking image — one that can't be fixed a week later.
This guide shows a different path: build the brand as a system of editable source files, not a pile of one-off outputs. One model company goes through five phases: company materials become a Brand Voice document (phase 1), which becomes a print-ready brochure with an editable source file (phase 2), the brand moves into a git repository as the single source of truth (phase 3), the website connects to it (phase 4), and finally an internal CRM with a properly locked-down database (phase 5). Security isn't a chapter tacked on at the end but a thread that runs through the whole process — and at the end there's also a section on why not to just “do it all in a chat window.”
You can read it phase by phase — each one stands on its own and has its own copy-paste prompts, just fill in the brackets. And above all: this guide assumes no technical background whatsoever. If you've never opened a terminal, don't know what git is, and the word “deploy” means nothing to you, you're exactly the reader it's written for — every account gets set up by clicking through step by step, every term gets a one-line explanation in the glossary right under this paragraph, and a sentence before each prompt says what happens after you send it and what you'll see on screen. More experienced readers can skip the explanatory passages; the prompts and the phase structure apply to both groups the same way. At the end of the guide is a chapter this website doesn't usually carry: real costs, with real numbers — how much the tools run per month, how much the same work would cost outsourced, and who this whole path isn't worth it for. Anyone rolling out AI more broadly across a company than just around the brand has a complete guide for that; this piece is its specific, deeply worked-out case study.
Glossary of terms
Before we get to work, here are fifteen terms you'll meet throughout the guide. You don't need to memorize them — come back here whenever you hit a word that doesn't feel familiar. Each term gets a one-sentence explanation here; we'll cover it in more depth the first time we actually use it.
- Prompt — the instruction you type to an AI in a chat window; in this guide, prompts sit in gray boxes and you copy them whole, filling in only the text in brackets.
- Terminal (command line) — a window where you type text commands instead of clicking; it looks intimidating, but in this guide you'll type only a handful of lines into it yourself, and Claude handles the rest.
- Claude Code — the version of Claude that runs right inside the terminal and can work with files, run commands, and drive git — you write to it in plain language, and it writes the commands for you.
- Claude Cowork — a mode of the Claude desktop app in which the AI works over a folder of files on your computer: reading them, creating and editing them, and controlling other apps through connectors.
- Git — a system that keeps a complete version history of a folder of files: who changed what, when, and why, with the ability to go back to any point; picture a box that remembers every state its contents have ever been in.
- Repository (repo) — one specific folder managed by git, for example “everything about our brand”; a private repository is visible only to the people you invite.
- GitHub — a web service where repositories live online, so a team and other tools can reach them; something like a shared drive, but with history and rules.
- Commit — one saved step in a repository's history, with a date, an author, and a description of what changed and why.
- Deploy — publishing a website to servers where the whole internet can see it; on Vercel this happens automatically after every change to the repository.
- Vercel — a service that hosts websites: it connects to your GitHub repository and automatically builds and publishes a new version of the site from every code change.
- Supabase — a service providing a database (storage for structured data, like subscribers and orders) along with user login; built on the PostgreSQL database.
- API key — a long generated string of characters your code uses to prove itself to a service — it works like the key to an apartment, so it must never appear in public code or in a prompt.
- Environment variables (env vars) — a place where API keys get stored safely: named values that a service (say, Vercel) hands to your code only at runtime, without ever sitting in the repository.
- RLS (Row Level Security) — rules built directly into the Supabase database that decide, row by row, who may read and change it; they lock down data even when something in the application goes wrong.
- MCP (connector) — the standard through which Claude connects to other apps and services (Affinity, Canva, a calendar…); for you it's just a setting you switch on once.
- Frontmatter, markdown — markdown is a simple text format (headings with hash marks, bullets with dashes) that your brand voice will be written in; you can open a file with a .md extension in any editor.
A typical scenario
Marta runs a small coffee roastery: six people, retail sales through an online shop and — increasingly important — wholesale to cafés. A design studio built her brand years ago: logo, colors, a twenty-page brand manual in PDF. Nobody has touched it since. Marta wrote the website copy, a colleague wrote the product descriptions, a part-timer wrote the newsletters — each in a different voice. The wholesale price list lives in Excel and changes twice a year.
Now she needs three things at once: a print-ready brochure for sales meetings with cafés, a new website to replace a slow template, and finally a proper record of her wholesale customers — until now, a spreadsheet anyone edits however they like. The classic route: a designer for the brochure (weeks of waiting, a new round for every price change), an agency for the website, a CRM “whenever there's time.” That adds up to months, and a budget a small roastery doesn't take for granted.
Instead, Marta spends one evening having her brand manual and her own copy distilled into a Brand Voice document. On the second evening she gathers a folder of photos and a price list and lets Claude Cowork, with Affinity, build the brochure — the result is a print-ready PDF and, alongside it, an editable .af source file she'll open in six months to update the price list. The brand voice goes on GitHub, the website reads from it, and the CRM sits on Supabase with a database locked down from day one. None of it is magic; it's a sequence of steps we're about to walk through.
One thing worth knowing about Marta: she isn't technical. She can use Excel, has never opened a terminal, and used to think “git” was a typo. Everything she does in this guide, she does for the first time — and that's the pace we'll describe it at. Where the guide says “click the button in the top right,” the button really is there.
Before you start: accounts, installation, and first launch
This whole guide runs on a handful of services and one application. In this section we'll set them up and install it — slowly, step by step, including exactly what you'll see on screen. If you already have a Claude account and the desktop app installed, feel free to skip straight to phase 1; we'll set up GitHub, Vercel, and Supabase accounts only in the phases where we first need them, so your head doesn't fill up with passwords to services that are useless for now.
Two practical notes before we start. First, the computer: an ordinary business laptop with Windows or Mac is enough — the heavy lifting happens in the cloud, your machine mostly just displays things. You need a few gigabytes of free space and a reasonable connection. Second, the people: one person can get through this guide, but it's more pleasant with two — one “driver” at the keyboard, one who reads and watches the steps. Either way, take notes: an ordinary document listing what you set up and where — no passwords, those belong in a password manager! Six months from now, this log will be worth more than it looks now.
The Claude account: why paid, and how to set it up
Claude is an AI assistant from Anthropic, and all five phases run on it. You create an account at claude.ai: click sign in, enter your email (or use a Google account), and confirm the code that arrives in your inbox. That gets you a free account — and you'll immediately run into its two limits. The first is practical: a free account has a limited number of messages, and longer work (the whole of phase 2 is one long working session) won't fit into it. The second is more fundamental and about data: company materials — a brand manual, price lists, internal copy — belong only in a paid account with contractual data protection. A free chat is not a place for internal documents; this rule comes back throughout the guide, and we mean it.
In practice that means: before you upload your first company file, get a paid plan. In account settings (your name icon at the bottom left → subscription settings), pick Pro; for long sessions with Cowork and Claude Code, the higher Max tier may come in handy later, but starting with Pro is fine, and upgrading takes two clicks. You'll find specific prices in the costs chapter at the end of the guide.
The desktop app and Cowork
Claude in a browser is enough for phase 1. From phase 2 on, though, you need the desktop app — only it has the Cowork mode, in which Claude works over a folder of files on your drive. Download the app at claude.ai/download (there are versions for both Windows and Mac); installation is an ordinary double-click on the downloaded file and clicking through a wizard, just like any other program. After launching, sign in with the same account you use on the web.
The first launch looks like this: you'll see a window very similar to the web chat — conversation history on the left, a message box in the middle. The difference is that the app can do more than chat: when you start a new conversation in Cowork mode, the app asks which folder on your drive Claude may access. You pick a folder (say, Documents/brochure-2026) and from that moment, Claude in that conversation sees the files in it — and only in it. This is important to understand right away: Cowork doesn't see your whole computer, it sees the folder you show it. When you want it to work on a different folder, you start a new conversation and show it a different one.
The second thing you'll see for the first time with Cowork: permission requests. When Claude wants to create a file, run an action in a connected app, or delete something, a dialog appears describing the action, with allow/deny buttons. Don't get into the habit of clicking through them without reading — this dialog is exactly where the rule “AI drafts, a human approves” gets applied. Reading two sentences before clicking is your entire security job in this phase.
Affinity: account, download, installation
Affinity is the app the brochure gets built in. It used to be a trio of paid programs (Designer, Photo, Publisher) from a company called Serif; after being acquired by Canva, it's now one app, and the basic version is free — you only pay for AI features through a Canva subscription, which you don't need for this guide. Here's how:
- Open affinity.studio (you can also reach it through canva.com). Click download — the site figures out on its own whether you're on Windows or Mac.
- Downloading requires a Canva account: if you don't have one, the wizard walks you through it — email, confirmation code, done. A free Canva account is enough.
- Run the downloaded installer with a double-click and go through the wizard (mostly clicking next). On a Mac, you drag the app icon into the Applications folder, as shown in the image that appears when you open the downloaded file.
- On first launch, sign in with your Canva account. You'll see a welcome screen with a choice of studio — vector, pixel, layout. You don't need to pick anything or learn to use the app yourself; in our workflow, Cowork will operate it, and you'll just review and approve the results. It just needs to be installed and signed in.
The last step is connecting it to Claude: in the desktop app's settings you'll find a connectors section (depending on the version, it may be called connectors or extensions), and in it, the Affinity connection. This is an MCP connector — the standard through which Claude controls other apps; the overview of MCP tools explains it in more depth. At the time of writing this connection is labeled beta, so its exact location in settings may change — if you can't find it, the fastest route is to just ask Claude in chat: “how do I connect the Affinity connector in the current version of the app?”
What a terminal is and when not to fear it
From phase 3 on, a terminal shows up in the guide — a window where you type text commands. For a lot of people this is the point where guides get shelved; that's why we'll get it out of the way now, while nothing is actually at stake yet.
You open a terminal like this: on Windows, press the Windows key, type “terminal,” and confirm; on a Mac, press Cmd+space, type “terminal,” and confirm. A window appears with a blinking cursor — nothing more. You type commands into it and confirm with Enter; a command is a sentence for the computer, like “list the files in this folder.” That's it. Nothing runs on its own, nothing gets deleted by opening the window, and when you don't know what a command does, you simply don't run it.
The reason you don't need to fear the terminal is even stronger in this guide: you'll barely type anything into it yourself. You'll install Claude Code into it — the version of Claude that runs in the terminal and writes commands for you. You write in plain language (“set up a repository and put this file in it”), Claude Code proposes commands, and — this is the important part — it asks before running anything significant. Your relationship to the terminal will be the same as to Cowork's dialogs: read, understand at least on the level of “what's about to happen,” approve. We'll walk through installing Claude Code in phase 3, where we first need it; it comes down to copying one install command from the official documentation (found at docs.anthropic.com) into the terminal and signing in with your account.
If this still sounds foreign, here's one trick to calm your nerves: you can have the whole first encounter with a terminal explained to you in advance. Send the following prompt to a plain Claude chat — it installs nothing, runs nothing, it just walks you through it. After sending it, you'll get an overview of what you'll see on screen, what to pay attention to, and what to ignore.
I've never worked with a terminal and I'm about to install Claude
Code on [Windows / Mac] following a guide. Walk me through it in
advance, without installing anything: exactly what will I see after
opening the terminal, what does the line I type into look like, what
does it mean when “nothing happens” after a command, and how do I
tell an error message apart from normal output?
Then explain what the Claude Code install command will do and how
I'll know the installation succeeded. Write for a complete beginner,
step by step, without jargon — and when you need jargon, explain it
right away.
You'll get back a personal mini-manual tailored to your system. Read it once beforehand, and keep it open next to the terminal once more; that turns the “black window” into an ordinary tool you just haven't run yet.
Passwords and accounts: the boring minute that pays off
Over the course of this guide you'll set up four or five accounts, and they'll end up holding your brand, your website, and your customer data. Two rules to follow from the very first account, while it's still cheap:
- A password manager. Every account gets its own generated password stored in a password manager (your browser's built-in one is fine to start, a dedicated app is better). One password for everything is a gamble for accounts that control a company website and database — whoever gets one gets everything.
- Turn on two-factor authentication at least for GitHub. GitHub is the key account in our setup: you sign into both Vercel and Supabase through it, so whoever controls GitHub controls the whole system. Two-factor authentication (confirming a login with a code from a phone app) lives in the security section of account settings; turning it on takes five minutes, and GitHub prompts you for it on its own.
And one organizational note: set accounts up with a company email address more than one person can access — not a colleague's personal Gmail that they'll leave behind in a year. This small detail is exactly what decides whether, in three years, the website “just works” or you're chasing down a former part-timer for a password.
How to read error messages and when to ask for help
One last thing to pack: something will definitely break. Not because you're a beginner — it breaks for professionals too — but a mistake scares a beginner because they can't yet tell a triviality apart from a real problem. Three rules:
- An error message is a report, not a verdict. Red text in the terminal or a dialog with an exclamation mark means “this step didn't work, and here's why” — nothing got deleted, nothing is on fire. Don't just read the message, copy it: select it, copy it, paste it into a conversation with Claude with the sentence “this is what it told me, what does it mean and what should I do?” You'll get a clearer explanation and a next step than a colleague in IT would give you at half past nine at night.
- Never fix more than one thing blindly at once. One change, one test. If you try five tips from the internet at the same time, you won't know which one helped — and you'll usually cause a second problem.
- Know what's irreversible, and try everything else without worry. Across the whole guide, there are very few irreversible actions: deleting a repository, deleting a Supabase project, rotating keys. Everything else — a bad piece of text, a broken brochure page, a botched deploy — can be undone, because everything has a version history. That, incidentally, is the answer to why we introduced git this early: git is the reason you don't have to be afraid.
Overview: what you'll need, and when
So you know what's ahead, here's the entire kit in one place. Right now: a Claude account on a paid plan, the desktop app, Affinity with a Canva account. In phase 3: a GitHub account (free, set up by clicking) and Claude Code in the terminal. In phase 4: a Vercel account (sign in through GitHub, no new password) and possibly a domain. In phase 5: a Supabase account (again through GitHub). Everything except the paid Claude tier runs for free; the costs chapter covers where the free tiers start to pinch.
Phase 1: the brand voice document — from a desk drawer to a lasting asset
A brand manual from a studio usually says what a brand looks like: logo, colors, fonts. It almost never says how the brand talks — and that's exactly what you need when more than one person, and increasingly an AI, is writing your copy. A Brand Voice document is a text file that describes tone specifically enough to write from: tone traits with examples, a vocabulary, forbidden phrases, “not like this / like this” pairs. The general method for building such a document from your own copy is covered in the tip on brand and tone of voice; here we'll walk through it on Marta's roastery, with an eye on the fact that this document will also be read by the brochure layout and the website build.
One rule right at the start: a brand manual, internal copy, and a price list are company materials — upload them to a paid account with contractual data protection, not to an anonymous free chat. This holds for the whole guide.
Where you'll work: a Project on claude.ai
Phase 1 happens entirely on claude.ai — in a browser or the desktop app, either works equally well. But we won't work in an ordinary conversation, we'll work in a Project. A Project is a folder of conversations with shared memory: files you upload to it are visible to every conversation inside it, so you don't have to attach the brand manual over and over. Set one up like this: in the left panel on claude.ai, click the projects item, then the button for a new project, name it (say, “Brand — roastery”), and confirm. The project page opens: a box for a new conversation in the middle, a section for project files on the side — that's where the materials will go in a moment.
Uploading files is simple: either drag files into the browser window, or click add file and pick them from your drive. Claude reads PDFs (including scans — it reads the text out of the image itself), Word documents, spreadsheets, and plain text files. Once uploaded, the files appear in a list; the project is now ready.
One more note on anonymization: a brand manual and your own copy are fine in a paid account. But if any of your materials contain personal data about third parties — say, an export of emails to specific customers — redact or replace names and addresses before uploading. You don't need them for learning tone, and having less sensitive data in circulation is always the better default.
Distilling from source materials
Gather what you have: a brand manual (Claude can read the PDF, scans included), website copy, a few newsletters, product spec sheets. The more real text, the better — tone gets distilled from how you already write, not from how you'd like to sound in a questionnaire. Gathering materials took Marta about an hour: she had the manual PDF in an email from the studio, copied the website copy into one document, and downloaded three newsletters from her sending service as PDFs.
How much material is enough? Rule of thumb: at least ten pages' worth of real copy from different situations (sales, informational, one unpleasant one — say, an apology for a delayed shipment, if you have one). If you don't have that much, that's fine — distill from what exists, and expect the follow-up questions phase to run longer; the document will simply come more from conversation and less from the archive. What not to include, on the other hand: copy an agency wrote that never sounded like you, and anything older than a couple of years if the company has moved on since. You'd be distilling a tone you're trying to shed.
Now the first prompt. What happens after you send it: Claude spends several tens of seconds reading the uploaded materials (you'll see a working indicator), then starts writing a structured document, section by section — about two to three screens of text in total. Don't be put off by the length, you'll read it in pieces; and don't close the conversation, we'll keep working in it.
I'm uploading our roastery's brand manual, website copy, three
newsletters, and a product spec sheet [add your own materials].
We are [a small coffee roastery, 6 people, we sell to cafés and
retail customers].

Build a Brand Voice document from this in markdown, structured as:
1. Who we are and who we talk to (2–3 sentences, no marketing fluff)
2. Tone: 4–6 traits, each with an explanation of what it means in
   practice and a sample sentence that demonstrates it
3. Vocabulary: words and phrasing we use (including technical ones —
   variety names, roast levels), and how we write numbers and units
4. Forbidden phrases: what never gets said here, and why
5. Examples: 3 “not like this / like this” pairs for a product
   description, a customer email, and a social media post

Work only from the uploaded materials. Where the materials
contradict each other, write it up as an open question at the end —
don't decide for me.
You'll get back a first draft of the document and — more valuable — a list of places where your own materials contradict each other (the website uses informal address, the newsletter formal; the shop says “specialty-grade coffee,” the manual says “specialty coffee”). Check the sample sentences especially closely: the model tends to slide into a generic marketing tone that sounds fine and belongs to nobody.
Follow-up questions: what's missing from the materials
The first draft has gaps — situations that aren't in the materials because they haven't happened in writing yet. The fastest way to find them is to flip the roles. Send the following prompt into the same conversation; here's what happens after you send it: Claude stops producing and starts asking — it poses the first question and waits for your answer, then the second, and so on. It'll feel like a conversation, not generation; budget twenty to thirty minutes for answering.
Go through the Brand Voice document we built and act like an editor
who has to write from it tomorrow: ask me every question the
document doesn't answer. I'm especially interested in:
- formal/informal address across different channels
- humor: how much fits on the website, how much in an email, how
  much in a sales proposal
- how we talk about competitors
- how we sound in an unpleasant situation (a complaint, a price
  increase, a delayed delivery)
Ask one question at a time, and fold my answers straight into the
document as I give them.
This is the single most important half hour of the whole phase: you're answering questions that would otherwise only surface once you're already in live production. Phrase your answers in your own words — the document should sound like you, not like the model.
Stress test
Before you call the document finished, test it on copy nobody has written yet. What happens after you send it: Claude writes three complete pieces of copy, followed by a short reflection on the places it wasn't sure about — that reflection is exactly why you're sending this prompt.
Here's our Brand Voice document [paste it] and here are three
writing tasks not covered in the materials: [a complaint email to
a café, a description of a new coffee, an invitation to a tasting
for wholesale customers].

Write each piece according to the document. Then add a short
reflection: which rules you weren't sure about because they could be
read two ways, and how you chose. Those exact spots are what we'll
sharpen in the document.
If the resulting copy is usable with minor edits, the document works. If it sounds foreign, the model isn't the problem — the document is too vague; go back and sharpen the examples. Save the finished document as brand-voice.md. In practice: ask Claude to print the final version whole in one block, copy it with the copy button on the reply, paste it into any text editor (Notepad on Windows, TextEdit on Mac switched to plain text), and save it under the name brand-voice.md — the .md extension matters, it tells other tools this is markdown. Then upload the file to the Project alongside the other materials as lasting context — from that point on, every conversation in the project has it on hand. In phase 3 it gets an even better home.
Marta's result after one evening: a two-page document that, for the first time, states in black and white that the roastery uses formal address, but without stiffness (“formal, not stuffy”), that it never uses the word “premium,” and that it only talks about competitors when a customer asks — and even then, factually. None of that had been written down anywhere before; it was all just “sort of known.” The difference shows the moment someone new has to write the copy — a person, or an AI.
Phase 2: a print-ready brochure through Claude Cowork and Affinity
Now for the main event: a ten-page print brochure for sales meetings with cafés. The goal isn't “a nice-looking image,” but two files: a print PDF for the printer and, alongside it, a native .af source file that stays fully editable — you send it to a colleague, open it again in six months, change the price list, and print it again. That's the difference between an output and an asset, and we'll keep coming back to it.
A quick word on the tools, so you know what you're working with. Affinity — originally a trio of apps, Designer, Photo, and Publisher, from Serif — is today, after being acquired by Canva, one app with three studios (vector, pixel, and layout), and the basic version is free; its native format is .af. At the time of writing, there's a connection to Claude: Claude Cowork (the desktop mode that works over a folder of files) can drive Affinity through an MCP connector — creating documents, laying out text and images, exporting. The connection is new and labeled beta, so check the current Affinity documentation for exact capabilities; the working principle described here — you brief and approve, Cowork clicks — doesn't depend on that and only the details might shift. What MCP is and how connectors get set up is covered in the overview of MCP tools.
A folder as the brief
Cowork works over a folder, so the brief is a folder. Set one up the ordinary way, like any other: in File Explorer (Windows) or Finder (Mac), open Documents, right-click → new folder, name it brochure-2026. Inside it, the same way, create a subfolder photos — and here you can happily dump a curated “everything I like the look of” selection; picking the one right shot for a page is exactly the work the next step delegates. Next, copy your current pricelist.xlsx into the folder, and create a subfolder copy with your materials (raw is fine: coffee descriptions from the online shop, the about-us text from the website — just copied into text files). And of course brand-voice.md from phase 1.
Give files names without spaces (pricelist.xlsx, not Price list FINAL (2).xlsx) — it's not a technical requirement, but it saves confusion when you reference files in prompts. And upload photos at full resolution, as they came from the photographer; print needs more pixels than a website does, and Cowork can shrink them on its own, but it can't enlarge them.
Then open the Claude desktop app, start a new conversation in Cowork mode, and when the app asks for a folder, pick brochure-2026. The conversation will show a confirmation of which folder Claude is working over — and you can begin.
Inventory and structure proposal
The first prompt doesn't produce anything — it proposes. With multi-step agent work, it pays to keep this rhythm: propose, approve, only then produce. What happens after you send it: Claude goes through the files in the folder (in the conversation you'll see it opening files one by one — that's normal and takes a moment), then writes out a proposed brochure page by page. Affinity doesn't even launch at this step.
Work over the folder brochure-2026. It contains a subfolder photos
(a selection I like — there are deliberately a lot of them),
pricelist.xlsx, and a folder copy with source materials. Our tone
lives in brand-voice.md.

Do an inventory: list what's in the folder, and propose the content
of a ten-page print brochure for cafés that buy coffee from us. For
each page, state: purpose, key message, which photos are candidates
(file names), and where the copy comes from. Pick fewer photos than
I'd expect — one strong shot per page beats a collage.
For the price list, propose which items belong in the print brochure
and which don't, because they change too often.
Don't produce anything yet, I'm waiting to approve the proposal.
You'll get back a page-by-page structure. Check two things: that the proposal counts on real photos (file names, not “a coffee photo goes here”), and that the printed price list only includes stable items — anything that changes more often than the brochure belongs on the website, not in print.
Building the document
Now Affinity launches for the first time. What happens after you send it: Cowork asks for permission to control Affinity (a dialog with an allow button — read it and allow it here), the app opens, and pages start appearing on their own. It's a strange thing to watch: the cursor moves, text pops in, and you're not touching anything. At each spread, Cowork stops, describes in the conversation what it laid out, and waits for your approval — you reply “go ahead” or write out changes. The whole build, with breaks for approval, takes an hour or two.
I approve the structure proposal with these changes: [notes]. Build
the brochure in Affinity as a new document: A5 portrait, 10 pages,
3 mm bleed, 12 mm margins. Take colors and fonts from brand-voice.md;
if a font from the manual isn't installed on the system, tell me and
propose a replacement — don't pick one yourself.

Go spread by spread: always lay out text and photos, show me a
preview, and wait for approval before continuing. Take copy from the
materials and adapt it per brand-voice.md; don't invent anything —
where copy is missing, leave a placeholder box marked MISSING and
give me a list of them at the end.
Set the price list as a table sourced from pricelist.xlsx; don't
retype the numbers by hand, pull them from the file.
The “spread, preview, approve” rhythm is slower than “just do the whole thing” — and that's exactly why it works: you fix an error on page 2 while it's still cheap. The line about pulling numbers from the price list isn't paranoia; retyping numbers by hand is the single most common spot where an error slips into an otherwise nice document — the kind that gets a job reprinted.
Iteration: why the source file exists
The first version won't be final, and it shouldn't be. Print it on an office printer (that's enough for proofreading), go through it with a pencil — on paper you'll notice things you'd miss on screen: type that's too small, a photo that clashes with its neighbor, a typo in a coffee's name. Then submit corrections as a list of specific changes. What happens after you send it: Cowork makes only the listed edits, shows a preview after each changed page, and where you asked for options, it stops and waits for you to pick.
Corrections after the first proofread:
- on page 4, swap the photo for [filename], it's sharper
- the price list item [name] changed: I've uploaded a new
  pricelist.xlsx, reload it and regenerate the table
- the headline on page 7 is off-tone; propose three variants per
  brand-voice.md and wait for me to pick one
Show me a preview of each changed page before you save the file.
Notice what just happened: you changed a price in a finished document and nothing else moved. With a generated image, this sentence wouldn't even make sense — the whole thing would regenerate, differently.
Export to the printer — and saving the source file
The last step of the phase. First, a quick note on the terms from the printer's email, so you know what you're approving: bleed is 3 millimeters of extra image beyond the page edge that gets trimmed off after printing (without it, you risk white slivers at the edges); CMYK is the color mode printers use (screens glow in RGB, printing happens in CMYK, and the conversion happens on export); 300 DPI is the dot density below which print looks blurry; PDF/X is a stricter PDF variant printers require because it must have fonts embedded. You don't need to understand this deeply — just forward the printer's requirements verbatim. What happens after you send it: Cowork saves the source file, exports both PDFs into the project folder, and prints a checklist; you'll then find three new files in the folder.
The brochure is approved. First, save the native file
brochure-2026.af into the project folder — that's the source file
we'll be editing in six months, it must not get lost.
Then export a print PDF per the printer's requirements [paste
verbatim from the printer's email — usually PDF/X, CMYK, 3 mm bleed,
crop marks, 300 DPI] and a separate light PDF for email (RGB, small
file size).
Finally, print a checklist: page size, bleed, page count, fonts
used, and whether they're embedded in the PDF.
Paste the printer's requirements verbatim — every printer's are a little different, and paraphrasing from memory is a good way to lose the bleed. The phase produces three files: brochure-2026.af (the source — archive it, share it with colleagues), a print PDF (for the printer), and a light PDF (for emails to cafés). The first is the most valuable, even though no customer will ever open it.
When something goes wrong
With a fresh connection to Affinity, things sometimes hiccup, and it can rattle a beginner who doesn't know what's normal. Three common situations and what to do:
- Cowork says it can't see Affinity. Most often the app isn't running, or the connector dropped. Close and reopen Affinity, check in Claude's settings that the connector is connected, and type “try again” into the conversation. Nothing was lost — the in-progress document is saved inside Affinity.
- What's on screen doesn't match what Cowork described. It happens: the agent reports a photo placed and the page is blank, or text overflows its box. Don't fix it manually in Affinity (you'd throw the agent's picture of the document's state out of sync) — describe what you see in the conversation instead: “page 5 is empty even though you said it was done.” The agent looks again and corrects itself.
- The conversation froze, or you accidentally closed it. The work isn't gone — the document is in Affinity, the files are in the folder. Start a new Cowork conversation over the same folder and open with: “We're continuing the in-progress brochure brochure-2026.af, open it and summarize what state it's in.”
The general rule behind all three: the source of truth is in the files, not in the conversation. A conversation is the tool that changes the files; when it gets lost or tangled, you start a new one and the files are waiting for you. That, incidentally, is another quiet argument for the whole source-file approach.
By the way, the same principle — Cowork over a folder, a human approving — works on the other end of a sales relationship too: the tip on business cards into a CRM uses it to turn a stack of business cards into a contact table. It'll come in handy in phase 5.
Phase 3: brand voice on GitHub — the single source of truth
The Brand Voice document now lives in a Project and in the brochure folder. That's two more places than is healthy: in six months the copies will drift apart, and nobody will know which one is authoritative. The fix is borrowed from developers: a git repository as the single source of truth. Not for fashion's sake — for three concrete properties. Versioning: every change to the tone has a date, an author, and a reason. Availability: a colleague can read the repository, and so can Claude Code when it builds the website, and Cowork when it lays out the next brochure. And unambiguity: whoever wants a change makes it here, not in their own copy.
You don't need to know git — Claude Code drives it for you, you approve. What that kind of collaboration looks like is shown more broadly in the guide to company knowledge. Before we dive in, let's walk through everything that sentence assumes — what git actually is, how you set up GitHub, and how you get Claude Code running. If you already have all of this, skip straight to the prompt at the end.
Git in plain terms: a box with version history
Picture a box for documents with one unusual property: it remembers every state its contents have ever been in. Whenever you add something to it or change something inside it, you say “save this state” and add a sentence about why you did it. The box remembers what, who, when, and why — and at any later point it can revert to any past state, or show you exactly what changed between two states. That's git. The box is called a repository, and one saved state is called a commit.
Why want this for a brand? Because it answers the questions you'll definitely ask in a year: “when did we stop using the word artisanal, and why?” (a commit with a date and a reason), “which version of the logo should go to the printer?” (the one in the repository — we don't have another one), and “who changed this?” (it's on every change). A shared drive can store files; git can also tell their story.
One more thing that follows from that metaphor and matters for security: the box also remembers what you took out of it. A file you once add to the repository and later delete stays traceable in its history. That's why this guide keeps repeating: look before you push, not after — a password committed “just for a moment” is a leaked password.
Setting up a GitHub account — by clicking
GitHub is a website where repositories live online. The account is free, private repositories included, and you set it up like this:
- Open github.com and click the sign-up button.
- Enter an email, choose a password and a username. The name will show up in repository addresses, so pick something short and decent — Marta chose
roastery-marta. - Confirm the code that arrives by email, and click through whatever wizard questions follow (how many of you there are, what you'll use GitHub for — the answers don't matter, the free plan is at the end of every path).
- Done. You'll see an empty dashboard — that's normal, it fills up with your first repository.
A repository for the first time: by clicking, no terminal
A repository can be set up entirely on the web, and for a first introduction we recommend it — you'll see there's no magic to it:
- On github.com, click the plus button in the top right and choose to create a new repository (New repository).
- Fill in the name
company-brand, a short description, and — most importantly — choose Private — a private repository is visible only to you and the people you invite. Also check the box to create a README file. - Click the green create button. The repository page opens — for now, it only contains the README.
- You can also upload files with a mouse: on the repository page you'll find an upload-files option (Add file → Upload files), drag files into the window, write a sentence at the bottom about what you're uploading (that's your first commit and its reason!), and confirm.
In theory, you could handle all of phase 3 this way, by hand. But we want Claude Code to populate and maintain the repository — it's faster, and we'll use the same interface in phases 4 and 5, where we can't do without it. The GitHub website stays useful as a viewing window: whenever you want to check what's actually in the repository and what its history looks like, open it in a browser.
Installing Claude Code
Claude Code is the version of Claude that runs in a terminal (remember the “What a terminal is” section from earlier — the mini-manual comes in handy now). Installation has three steps: open a terminal, copy the install command from the official documentation at docs.anthropic.com into it (the command changes from time to time, so we won't reproduce it here — look for the Claude Code page, installation section), and confirm with Enter. Installation output will run; once it stops, type claude, confirm, and go through sign-in — a browser opens where you sign in with your Claude account and confirm the connection. From that moment, the claude command in the terminal starts a conversation that looks almost like the web chat — it just also works with files and runs commands.
Two things worth knowing for your first encounter with Claude Code. First, it matters which folder you launch it in — just like Cowork, it works wherever it's standing. For our work, create a company-brand folder in Documents, cd into it in the terminal (type cd Documents/company-brand — “cd” stands for change directory), and only then run claude. Second, Claude Code asks before important actions: you'll see a proposed command and a question about whether it may run it. The same rule as with Cowork applies — read, understand at the level of “what's about to happen,” then approve.
For your very first session, it's worth asking for a walkthrough. What happens after you send it: Claude Code answers in plain language, matches its pace to yours, and from then on explains every proposed command as it goes.
I'm a complete beginner — this is my first time working with a
terminal and with git. Before you run any command in this session,
explain in one sentence what it does and what will change on disk or
on GitHub. For commands that delete or overwrite something, flag it
to me explicitly. When something goes wrong, explain the error
message in plain language and propose next steps.
This “teaching contract” costs nothing and turns your first hour with the terminal from risky groping into a guided tour. Once the explanations start feeling unnecessary, you'll simply stop asking for them.
Setting up the brand repository
Now for the actual setup. Move the files the repository should contain into the company-brand folder (brand-voice.md, logos, the brand manual), and send the prompt. What happens after you send it: Claude Code prints the planned structure, creates the files, and pauses before the first commit to print a list — it wants you to review it. At the end, it asks about connecting to GitHub; confirm, and the repository will show up in your account, where you can see it in a browser.
Set up a new git repository company-brand with this structure:
- brand-voice.md (insert the attached file)
- logos/ (attached SVG and PNG files)
- colors-fonts.md (pull color values and font names from the
  attached brand manual, and note where each color is used)
- README.md: what the repository is for, and the rule that
  brand-voice.md is the single source of truth — anyone who wants a
  tone change proposes it here
Add a .gitignore that excludes .env files, keys, and working
exports. Before the first commit, print me the full list of files
you're about to commit — I'll check that nothing sensitive is in
there.
Set up the repository as private.
That second-to-last sentence is the security rule in practice: look at what's going into git before you push it, not after. What belongs in the brand repository and what doesn't:
- Belongs: brand voice, logos, colors and fonts, document templates. Brochure source files (.af) are welcome too — that's exactly so a colleague can find them.
- Consider carefully: the wholesale price list. It can live in a private repository; but the moment you ever make the repository public (say, to share templates), the price list is the first thing that has to go. It's safer to keep it separate.
- Never: API keys, passwords, tokens, exports containing personal data. Not even “just for a moment” — git remembers deleted files in its history too.
What you'll see on GitHub once it's done
Open github.com, click company-brand in your list of repositories — and take a moment to look around, because you'll use this interface as your viewing window. The main area shows files and folders; clicking brand-voice.md displays the file right in the browser, nicely formatted (GitHub understands markdown). Above the file list is a tab with commit history: each row is one change, with a description, author, and time, and clicking it shows exactly what changed — deleted lines in red, added lines in green. In the top right is repository settings; inside it, a section for inviting collaborators (Collaborators) — that's where you invite your marketing colleague, by email or her GitHub username, and from that moment she can see the repository too. You don't need to actively operate any of this; just know you can come look at what's in the box and how it got there, any time.
How tone changes from here on
The repository also changes how decisions about the brand get made. When a marketing colleague decides “artisanal roast” sounds tired now, she doesn't quietly change it in her own newsletter — she proposes a change in brand-voice.md (even just as a sentence in chat: “propose an edit to the vocabulary, retire this word, and suggest replacements”), and Marta approves it, or doesn't. The change carries a commit, a date, and a reason; a year from now you can trace when and why the brand shifted. And because the website and the brochure both read this file, one approved change propagates everywhere text gets written or laid out next. That's the whole magic of a “single source of truth”: not that there's one file, but that all decisions happen over it.
Phase 4: a company website that reads brand voice from the repository
The whole process of building a website with Claude Code — from the first prompt through git as a safety net to deploying on Vercel and a domain — has its own detailed guide on this site, and we won't rewrite it here. What we will add are the beginner steps that guide moves through faster: what “deploying a website” actually means, how the first clicks in Vercel work, and where exactly in its interface the things we'll talk about live. And then one extra connection that's the heart of this phase: the website shouldn't have its own, third copy of the brand's tone — it should read the one in the repository.
What “deploying a website” means
The website Claude Code builds for you starts out as just a folder of files on your drive — a company-website repository, which you'll see on your GitHub next to the brand repository. For the world to see it, it has to run on a server — a computer that's always on and connected to the internet. That move is called a deploy. It used to mean renting a server and carrying files onto it by hand; today a service like Vercel does it for you, and cleverly: it connects to your GitHub repository and, on every change, automatically builds and publishes a new version of the website. Deploying, then, isn't a task you learn — it's a side effect of having changed something with Claude Code and committed it. This link is exactly why we introduced git back in phase 3: a repository isn't just an archive, it's a production line.
Vercel: setting up an account and first deploy
The best way to set up a Vercel account is to sign in through GitHub — no new password, and the services connect right away:
- Open vercel.com, click sign up, and choose to continue with GitHub. GitHub will ask if Vercel may access your account; confirm.
- After signing in you'll see a dashboard and a button to add a new project (Add New → Project). Click it — Vercel lists your GitHub repositories.
- For the website repository (
company-website), click import. Vercel detects the framework on its own and pre-fills settings; change nothing, and click Deploy. - What you'll see: a build log runs for a minute or two (rows of text you don't need to read), then a congratulations screen appears with a preview of the site and an address like
company-website.vercel.app. Click it — your website is publicly on the internet for the first time.
That address ending in vercel.app is a temporary calling card; you connect your own domain like this: buy a domain (Marta's is a Czech roastery-marta.cz) from a registrar — search for domain registration, pick a registrar, check the name is available, and pay for a year's registration. Then, in Vercel, open the website project → Settings → Domains, enter the domain, and Vercel will show you two DNS records you need to set up at the registrar (its admin panel usually has a DNS management section). It sounds more technical than it is: you're copying two values from one website into another, and if you're not sure, that exact task is a legitimate question for the registrar's support — or for Claude. What happens after you send the following prompt: Claude recognizes your registrar's admin panel from your description and walks you through the form fields; after saving the records, it can take a few hours for the change to take effect — that's normal for DNS, not an error.
I'm connecting a domain [roastery-marta.cz] to my Vercel project.
Vercel shows me these DNS records to set up: [paste the values from
Vercel]. My domain is with the registrar [name], and in its admin
panel, DNS section, I see this: [describe or paste what you see].
Walk me through it step by step: which fields to fill in with what,
what to delete or leave alone, and how I'll know it's working. Flag
it if anything you see looks like it could break email on the
domain.
That last sentence isn't decoration: the most common accident when repointing a domain is accidentally deleting the mail record (MX) — and you only notice emails have stopped arriving a few days later.
One last term for this phase: environment variables. Once we connect the website to a database in phase 5, the code will need API keys — and those, as we already know, must never go into the repository. Vercel has a secure box for them: in the project, open Settings → Environment Variables, and you'll see a form with two fields, name and value. That's where you paste a key (say, name SUPABASE_SERVICE_KEY, value copied from Supabase), save it, and Vercel hands it to the code on every deploy — without it ever sitting in git. Remember this spot, we'll come back to it in phase 5.
Connecting the website to brand voice
Now for the main event. The following prompt belongs in Claude Code, run inside the website folder. What happens after you send it: Claude Code first lays out a comparison of options (it won't pick one for you), and once you choose, it goes through the website's copy and returns a list of sentences to fix — nothing changes until you approve the fixes one by one.
In the website project, use brand-voice.md from the company-brand
repository as the source of tone. Specifically:
1. Propose the simplest way to bring it into the website project and
   keep it current [a copy with an update script, a git submodule…]
   — explain the difference and recommend the option for a small
   team
2. Then go through all the website's copy and list sentences that
   conflict with brand voice: forbidden phrases, wrong form of
   address, off-tone language
3. Only propose fixes, don't write them — I'll go through them one
   at a time
The practical payoff is bigger than it sounds: every future piece of website copy — a new page, a product description, an error message — gets written with brand voice in context, so Marta's roastery sounds the same on the website as it does in the brochure. And before every deploy, consistency can be checked with a single prompt. What happens after you send it: Claude Code goes through the copy files (it takes a moment) and returns a table of findings with the number of files it actually checked at the end — that number is your check that it went through everything:
Before we deploy a new version of the website: compare all the copy
in the content directory against brand-voice.md and return a table:
file, sentence, rule broken, suggested fix. Flag separately any spot
where a rule works against clarity or the page's SEO needs — I'll
decide those.
Don't report “all clear” until you've printed how many files you
actually went through.
That last sentence is insurance against the most common way review prompts fail: the model checks three files out of thirty and happily calls it done. Ask for the number.
Two security notes on Vercel that fit more naturally into a website guide than they do here. First, environment variables come in two categories: keys (say, to Supabase in the next phase) belong in Settings → Environment Variables, as shown above — but watch the difference between variables that stay on the server and ones the framework ships to the browser. With Next.js, a simple rule applies: anything with the prefix NEXT_PUBLIC in its name ends up publicly readable in every visitor's browser. A service key must never be named with that prefix — and if you're not sure, just ask Claude Code: “which of my environment variables end up in the browser?” Second, preview deploys: Vercel creates a preview version of the site at a public address for every change, which is great for showing work-in-progress to colleagues — but it means even unfinished versions have a public address. Turn on deployment protection: in the project, Settings → Deployment Protection, the option requiring sign-in. Only the signed-in team then sees work-in-progress versions — including, say, a not-yet-public price list.
One more thing every website guide owes beginners: Vercel's free Hobby tier is licensed for non-commercial use only. A roastery's company website is commercial use, so it belongs on the Pro tier. The website will run fine on Hobby too — nothing stops you from deploying — but you'd be violating the terms of service, and an honest guide has to flag that. You'll find the numbers in the costs chapter; Hobby is fine for trying things out and building, switch to Pro for a company website's production run (in team settings, one click and a payment card).
Life after launch
So it's clear what state you're working toward: a finished website doesn't mean the end of work with Claude Code, just a change in its character. A typical month then looks like this — you open a terminal in the website folder once or twice for a specific change (“add a banner for the September tasting to the homepage, take the copy from the attached document, and check it against brand voice”), Claude Code prepares the change, you review it at the preview address, approve the commit, and Vercel deploys it within a minute. None of those sessions take longer than an evening cup of tea. On top of that, a consistency check prompt now and then (you have it above), and a quarterly security review from the security chapter. The website stops being a project and becomes a tool — and that's exactly the state where the investment from the first few weeks starts paying back: the speed of response we'll add up in the costs chapter happens right here.
Phase 5: an internal CRM on Supabase
This phase has its own follow-up: the detailed guide to building an internal CRM goes into depth we'll only sketch here — what data to build a CRM from, the complete SQL schema, roles and policies explained sentence by sentence, and newsletter records including GDPR. Here we'll stick to the backbone of the process, so the roastery's story finishes in one piece.
The final phase is the biggest jump: from materials to an actual application with a database. Marta's CRM is meant to be simple — wholesale customers, contacts, orders, visit notes — but it holds customers' personal data, and that changes the rules. A spreadsheet on a drive stops being enough not because of missing features, but because of control: who saw it, who changed it, where it is.
For a reader who's lived in Excel until now, a quick word on what a database is and how it differs from a spreadsheet. At first glance, not much — both have rows and columns. The difference is in the rules: a database has fixed constraints on what can go in which column (you can't type “sometime in summer” into a date field), tables can reference each other (an order belongs to a customer — and when the customer's name changes, all their orders know it), several people can work in it at once without overwriting each other's cells, and above all: it has permissions. Who may see and change what isn't a question of who forwarded a link to whom, but a rule written into the system. That last property is exactly why we're moving — and it's what the rest of the phase focuses on most.
Supabase fits here for three reasons. It's a managed PostgreSQL database with built-in login (Supabase Auth: email and password, magic links, sign-in through Google — never roll your own cryptography), it has Row Level Security — rules built directly into the database that say who may read and change which row — and when you set up a project, you pick a region: for customers' personal data, choose EU, and your data sits in European jurisdiction.
Setting up a Supabase project — by clicking
- Open supabase.com and click to start a project. Sign in through GitHub (the same connection as with Vercel — no new password).
- After signing in, a wizard walks you through setting up an organization (name it after your company, free plan) and then offers a new project (New project).
- The new-project form has four fields, and one of them is the most important choice of the whole phase. Project name (say,
crm-roastery); a database password — generate it with the button and save it in your password manager, you'll need it rarely, but painfully if you don't have it; and a Region dropdown. This is where you pick which country your data physically sits in: open it and choose a European region — Central EU (Frankfurt) is a solid choice. The region can't easily be changed after setup, so it's a “now, or a migration later” decision. - Click create. The project takes a minute or two to set up (you'll see a status screen), then the project dashboard opens with a menu on the left: Table Editor (tables, empty for now), SQL Editor, Authentication, Settings.
API keys: where they live, and where they belong
Before we let Claude Code into the project, a quick tour that'll take the fear out of keys. In the project menu, open Settings → API. You'll see the project address and two keys — long strings of characters with a copy button:
- Anon key (public). This one lives in the website's code and reaches the browser — that's expected. On its own it doesn't allow anything; what it can actually do is determined by RLS policies. Think of it as the key to a building's front door, in a building where every apartment is locked.
- Service key (service_role). This one bypasses every lock — RLS policies don't restrict it. It belongs exclusively in server-side environments: in Vercel, in Settings → Environment Variables (without the NEXT_PUBLIC prefix!), never in the repository, never in a prompt, never in code that runs in the browser. Think of it as the master key to every apartment — and it gets treated accordingly.
If the service key ever does leak (accidentally committed, pasted into a chat), a fix exists, and it's unpleasant enough that you won't want to repeat it: on that same page you can regenerate the key (rotation) — the old one stops working, and you set the new one everywhere it was configured.
Schema and locks in one step
The key decision of the whole phase: RLS gets turned on in the first migration, not “once it's working.” A database that gets locked down after the fact always has a window where it's wide open — and that's exactly when accidents happen. (A migration is a written step of database change — “create these tables, set these rules” — saved as a file in a repository; a database gets its own version history this way, just like the brand and the website.)
The prompt belongs in Claude Code, run in the CRM project folder. What happens after you send it: Claude Code prints the proposed tables and policies as text to read, then explains the migrations one at a time and waits for your approval on each — nothing gets written to the database until you say yes.
We're building an internal CRM for our roastery's wholesale
customers on Supabase. Propose a database schema: tables customers,
contacts, orders, notes. For each table, write Row Level Security
policies right away — RLS must be on from the first migration, not
added later:
- a signed-in team member can read everything; only the admin role
  can delete
- a signed-out user sees nothing
- the service key is used exclusively in server-side code; only the
  anon key, restricted by RLS policies, goes to the browser
Generate SQL migrations, and add a comment to every policy stating
exactly what it allows and for whom. Before you run anything, explain
the migrations to me as someone who doesn't read SQL daily — I'll
approve each one separately.
You'll get back migrations with commented policies. Even if you can't read SQL, you can read comments — and that's enough to ask questions like “why can anyone signed in read this?” Don't run anything you don't understand at least at that level; it's the same principle as with copy: AI drafts, a human approves.
Red team on your own database
Policies nobody has tried to break are a hypothesis. Test them — on a test project, not on live data. (A test project is a second Supabase project with the same schema and made-up data; the free plan handles two projects, so it costs you nothing.) What happens after you send it: Claude Code prints a list of attacks with verdicts — none of them run yet; the tests it proposes, you approve one by one.
Play the attacker: you have our Supabase project's anon key (by its
nature, it's public in the website's code) and you know the database
schema. List every query you'd try to reach customer data without
signing in, or, with an ordinary account, to reach data you're not
entitled to.
For each query, state whether the current RLS policies stop it and
why. Where you're not sure, propose a specific test — we'll run it
against the test project with made-up data, not against live data.
A typical finding: a table where RLS never got turned on (readable in full through the anon key), or a policy written only for reads while writes stayed wide open. Both take five minutes to fix — once you've caught them now.
On sign-in, practically speaking: you don't set up accounts for the roastery's six people by hand in the database — Supabase Auth has invitations and user management in its admin panel, and a role (who's an admin with delete rights) is handled as a user attribute that RLS policies reference. An employee leaving then means one click: deactivate the account, and the policies cut them off from everything at once. Compare that to a spreadsheet on a shared drive that who-knows-who has a link to — that's the difference between a record and a system, and it's exactly why phase 5 pays off even for a small company.
What a finished CRM looks like in production
So a beginner knows what they're working toward: a finished CRM is an ordinary web page at an internal address (say, crm.roastery-marta.cz — a subdomain connected in Vercel the same way as the main domain, the project hidden behind sign-in). The wholesale colleague keeps it in her bookmarks; once signed in, she sees a list of customers, and for each one, contacts, order history, and visit notes. Appearance and scope are driven by prompts in Claude Code, same as with the website — start with the smallest version that replaces the spreadsheet (a list, a detail view, adding a record), and expand as actual use dictates. That process — what data to start from, how to bring over history from the Excel sheet, and how to add newsletter records — is covered by the detailed CRM guide; for the sake of the story, it's enough to know that between “a schema with policies exists” and “the team works in it daily” lies a handful of evenings of iterating, not months of development.
The agent reads, the human writes
Once the CRM is alive, connecting it to AI is tempting: regular summaries, follow-up suggestions. The rule from the whole guide applies double here — the agent may read and suggest; a human approves every write to live data and every message that goes out. In practice that means giving the agent read-only access and phrasing tasks as producing drafts. The following brief is worth saving as a scheduled task (Claude can run tasks on a schedule); here's what then happens every Monday: a finished table of drafts will be waiting for you in the conversation — no email sent, no record changed, until you decide.
Rules: you may read from the CRM, you never write to it, and you
never send anything.
Every Monday, go through the last three months of orders and prepare
for me:
- wholesale customers whose orders dropped more than a third against
  their usual average
- customers who haven't ordered in more than 6 weeks
- for each one, a draft of a short follow-up email in our tone per
  brand-voice.md, with a specific reason for reaching out
The output is a table of drafts. I decide who gets written to, and I
send it myself.
Notice that brand voice from phase 1 is at work here too — a follow-up to a café sounds like the roastery, not a robot. The circle closes: one document, four different uses.
Marta three months later
A short stop at the model company before the numbers — the best test of a system is ordinary operation, not a launch party.
The brochure went through a second edition: in September the wholesale price list changed, Marta opened a conversation over the brochure-2026 folder, uploaded a new pricelist.xlsx, and forty minutes later a print PDF was on its way to the printer — the same change that, in spring, meant three weeks of waiting on a designer. The website is alive: two new pages (a fall tasting, a new variety), both written with brand voice in context, both deployed the same evening they were written. Eleven new café customers joined the CRM; the Monday summary from the agent once caught a café that had quietly stopped ordering — a follow-up in the roastery's tone (written as a draft, sent by Marta) brought it back into the active column. And the brand voice document has its first approved change behind it: the word “honest” moved into the overused pile after a discussion, the commit has a date and a reason, and neither the website nor the newsletter has used it since.
Not everything went smoothly, and that belongs here too: the first Affinity connection crashed on a dropped connector (fixed by restarting the app), one evening was lost to tangled domain DNS (fixed by a prompt describing the registrar's panel), and once Marta nearly committed a file of sales-meeting notes — caught by the pre-commit file-list check the guide insisted on. The system works not because nothing breaks, but because the breakages are cheap and reversible.
How much time to set aside
Before the money, the time — on this path, time is the real investment. The estimates are for a complete beginner working evenings; a more experienced reader can halve them. They're honest estimates, not marketing ones: they include the hour spent hunting for a button that was in the top right the whole time.
- Setup (accounts, installation): one evening. Most of the time goes to Affinity and your first encounter with the desktop app.
- Phase 1 (brand voice): two evenings — an hour gathering materials, two to three hours of distilling, follow-up questions, and the stress test.
- Phase 2 (brochure): two to three evenings. The first is the slowest (you're learning the approval rhythm); corrections and export move faster. Compare that to weeks of waiting on the outsourced route — but don't expect a finished piece out of the printer on the first evening.
- Phase 3 (GitHub and Claude Code): one evening, installation and the first guided session included.
- Phase 4 (website): be realistic here — a weekend for a first version, then two to three weeks of evening iteration before you call the website done. It's the biggest chunk, and the detailed guide for it moves at its own pace.
- Phase 5 (CRM): an evening to set up the schema with policies, another two or three for the application around it and moving data over from the spreadsheet.
All told: roughly six to eight weeks of evenings, with usable output landing along the way — the brochure exists by the second week, not only at the end. And a second honest note: this isn't a “build it and forget it” project. The system then runs on a small, steady amount of care — a few hours a month on content updates, and a quarterly review. Which is exactly why the closing question of the next chapter matters: who in the company will own this.
How much it costs: real numbers
This website doesn't generally publish service prices — they change faster than articles do. For this guide we're making an exception at the reader's explicit request, because “how much does it cost” matters as much as “how do you do it,” and hedging on it would be a cop-out. Two rules apply throughout: every figure below is a price as of August 2026 — and prices change, so verify current pricing before deciding. Where the original Czech figures were quoted in koruna, we convert to US dollars at roughly 21 CZK per dollar — the rate in effect in August 2026 — and round; these Czech-market figures, like most foreign price lists, are usually quoted before VAT, so up to 21% can be added depending on how you buy. Where to verify: the official price list of the service in question, usually linked from the footer, and, for country-code domains, your registry and registrar's own pricing. Third-party comparisons (this one included) go stale; the price list is the truth.
Tool pricing, line by line
- Claude (subscription). The Pro tier costs $20 a month (paid annually, $17 a month). Pro is what the whole guide needs — Cowork and longer working sessions don't fit into a free account, and company materials don't belong there either, as a matter of principle. The Max tiers (5x and 20x the limits) cost $100 and $200 a month respectively; reach for those only once you're working with Claude Code and Cowork genuinely every day and Pro's limits start slowing you down. Start with Pro — upgrading is a click away at any time.
- Affinity. After the Canva acquisition, the base app — the full layout, vector, and photo tooling, i.e. everything phase 2 needs — is free. Only the AI features (background removal, image generation) cost money, tied to a paid Canva subscription; our process doesn't need them. A zero-cost line item that, a few years ago, would have meant thousands in licenses.
- Canva Pro (an alternative to Affinity). If you went the Canva route from the alternatives chapter instead of Affinity: the Pro tier costs $18 a month, or $144 a year ($12 a month) billed annually. Basic Canva is free, but the branded templates and export features you'd actually want for a company sit in Pro.
- Vercel. The Hobby tier is free — but licensed for non-commercial use only. A company website belongs on the Pro tier: $20 per user a month (one user — the account the sites run under — is enough). For the building-and-testing phase, Hobby is fine.
- Supabase. The free tier handles a surprising amount: databases up to 500 MB, two projects, tens of thousands of signed-in users a month — plenty of performance headroom for a six-person CRM. But it has two catches: the project goes to sleep after a week of inactivity (you wake it up by hand in the admin panel), and there are no backups. For live company data, budget for the Pro tier: $25 a month per project — you get backups, and the project stops sleeping.
- Domain. A country-code domain (Marta's is a
.czdomain, priced by Czech registrars) typically runs about $10–20 a year through a local registrar — watch out for “first year for a few cents” promotions; what matters is the renewal price from year two on. That works out to roughly $1–2 a month. - Brevo (newsletter sending). The free plan allows 300 emails a day — enough for a roastery starting out. The paid Starter tier begins at $9 a month (for 5,000 emails); you pay by volume sent, not by number of contacts.
- GitHub. Free, unlimited private repositories included — no asterisks for our purposes. Paid tiers (from $4 per user) cover team features a small company won't need for a long time.
The monthly total
Two realistic setups — a starter one for the learning-and-building phase, and a production one for running commercially:
| Item | Starter setup | Production |
|---|---|---|
| Claude Pro | $20 | $20 |
| Affinity | $0 | $0 |
| GitHub | $0 | $0 |
| Vercel | $0 (Hobby, building only) | $20 (Pro) |
| Supabase | $0 (free tier, testing) | $25 (Pro) |
| Brevo | $0 (up to 300 emails/day) | $9 (Starter) |
| Domain (country TLD) | ~$1 | ~$1 |
| Total per month | ~$21 | ~$75 |
Annually, production operation comes out to roughly $900; anyone switching to Claude Max for genuinely daily, intensive work adds roughly $80 a month on top and lands north of $150 a month. VAT may apply on top of these figures, as noted at the start of this chapter. That's not pocket change — and we're deliberately not rounding it down. Only the comparison that follows gives it context.
One more note on costs the table doesn't show, since a small company typically won't hit them — but should know about them anyway. Vercel and Supabase both bill beyond the plan for exceeding limits; a roastery's website and CRM won't come close to Pro-tier limits, but if the website ever “goes viral,” the bill can climb — both have spending alerts in settings, turn them on. Brevo's price also climbs with volume. None of this is cause for worry; it's why the quarterly subscription check below isn't a formality.
What the same thing costs externally
The ranges below are orientational — they reflect typical Czech market rates and quotes at the time of writing, converted to US dollars at roughly 21 CZK per dollar. They vary by region, vendor reputation, and scope, and any given job can land above or below them. Don't read them as a knock on vendors — a professional isn't just selling hours, but years of experience. Treat them as an order-of-magnitude guide:
- A brochure from a designer: designing and laying out a ten-page print piece typically runs $700–$1,900 as a one-off. Every later update (a new price list, swapped photos) is a new round: roughly $50–$150, and, more to the point, days to weeks in the designer's queue.
- A simple company website from a studio: a brochure site without a shop, roughly $1,400–$7,100 one-off, plus ongoing maintenance and small changes typically $25–$95 a month, or billed hourly.
- An off-the-shelf CRM (license): cloud CRMs are sold per user per month, typically $12–$38 per user depending on tier. For the roastery's six people, that's $70–$230 a month — every month, forever, for a system whose feature set a small company never opens half of.
- A copywriter: roughly $25–$70 an hour; a newsletter or a longer web page as a one-off project runs in the low hundreds.
The total for Marta's scenario (brochure + website + a year of CRM for six people): call it $2,400–$9,000 one-off, plus $950–$2,900 a year for a CRM license and website upkeep. Against that, the in-house system: about $900 a year in tools — and the not-inconsiderable evenings of work you don't pay for in the outsourced version. If it were only about money, the in-house route wins by an order of magnitude; but money is only the second consideration.
The third column: speed and the ability to react
The real difference isn't measured in dollars, but in the hours between “we need a change” and “the change is live.” A few situations from Marta's year, with estimates:
- Changing the wholesale price list. In-house: open the brochure's source file, load the new price list, regenerate the table, export — within an hour, same day, and the website updates with the same commit. Outsourced: an email to the designer, waiting in a queue, a proofing round, an invoice — usually 3–10 business days, plus an hour or two of your own coordination on top. When a new café wants a proposal tomorrow, this gap decides the deal.
- A new website page (a seasonal offer, a tasting event): in-house, 20–60 minutes with Claude Code, deployed the same evening. Outsourced: a request into the studio's queue — days, and weeks with smaller vendors.
- An extra CRM field (“we need to track who has one of our espresso machines on loan”): in-house, one evening — a migration, a form field. With a boxed CRM, either the feature already exists (and you're paying for whatever tier has it), or you file a feature request and wait, possibly forever.
Add it up soberly: a company making a handful of such changes a month saves dozens of hours of waiting a year — and that waiting is often costlier than the hours themselves, since it means missed opportunities and stale materials used instead of fixed ones. The in-house system also compounds: the second brochure takes a fraction of the first one's time, because the folder, brand voice, and prompts already exist.
An honest tally
| In-house system (this guide) | Outsourced work | |
|---|---|---|
| Setup | evenings of work over 6–8 weeks | $2,400–$9,000 and weeks of waiting |
| Operation | about $21–$75 a month + a few hours of upkeep | website maintenance and a CRM license, roughly $95–$285 a month |
| A change (price list, copy) | hours, same day, free | days to weeks, hundreds to thousands per round |
| What you own | source files: .af, git, code, schema | outputs; source files often stay with the vendor |
| What it takes from you | one person who learns it and owns the system | budget and patience |
And now the sentence this chapter can't end without: it isn't free — and the real cost isn't measured in money. The tools run a few hundred dollars a month at most, which against outsourced work is practically noise. The real cost is one specific person who learns this, owns the system, and gives it evenings at the start and a few hours a month forever after. If that person exists at your company — maybe it's you, if you've read this far — the in-house path is cheaper, faster, and leaves you owning real assets at the end. If that person doesn't exist, and nobody wants to become them, this guide isn't worth it for you: an unowned system decays, brand voice goes stale, the CRM stops getting filled in, and a year from now you'll have just another pile of half-dead tools — more expensive than an honest one-off job with an agency that at least has a clear end point. That's not a failure, it's a legitimate choice; just make it deliberately, not by letting the guide “kind of” not get finished.
Finally, a small piece of hygiene once you actually have subscriptions running: once a quarter, have someone tally up what you're really paying and whether it matches what you're actually using. What happens after you send it: Claude checks current prices on the web (you'll see it going through price lists) and returns a table of recommendations — you cancel or change plans yourself, the prompt doesn't pay for or cancel anything on its own.
Here's the list of subscriptions the company pays for around AI and
the website: [Claude, Vercel, Supabase, Brevo, domain — fill in
tiers and prices from recent invoices]. Check current pricing for
these services online and compare: are we paying for a tier we
don't use anywhere (limits, features)? Is there an annual billing
option for any of them that would pay off? Has any service raised
its price against what I have noted?
Return a table: service, what we pay, what we could pay, what to do
about it. Don't cancel anything and don't sign into anything —
decisions and clicks are mine.
Why not “just generate it in a chat window”
Now for the question hovering over this whole guide: why all this machinery, when ChatGPT or Gemini can generate a brochure image in a minute? The answer is the article's central thesis: a pixel output from a chat window is a dead end; a source file is a living asset.
For a reader new to generative tools, the difference in plain terms first. When an AI “generates a brochure image,” the result is one big photograph — pixels, as if you'd photographed a printed page with your phone. It looks like a document, but it isn't: no text you can fix, no table you can reach into, no pages you can rearrange. By contrast, the file Cowork builds in Affinity is an actual document — text is text, a table is a table, a photo is a swappable photo. On screen both can look the same; the difference shows at the first correction.
A generated image can't be opened and fixed. A pricing error means generating it again — and since generation isn't deterministic, the new version comes out different: a different layout, slightly different colors, a different typeface. Text in generated images is still a lottery too (diacritics, garbled characters), and brand consistency across ten pages is out of the question — each page is a fresh roll of the dice. For a printer, an RGB image with no bleed at an unknown resolution isn't a usable file to print from. And finally, rights: with a proper layout you know whose font and photos are in it, because you put them there; with a generated image you're vouching for output of unknown origin.
| Question | Image from a chat window | Source file (.af, git, code) |
|---|---|---|
| A pricing error | Generate again — and the whole thing comes out different | Open it, edit the cell, export |
| Consistency across 10 pages | Every page is a fresh roll of the dice | Styles and a template keep everything consistent |
| Print (CMYK, bleed, DPI) | An RGB image the printer will reject | Export a PDF/X exactly to spec |
| Handing off to a colleague | You send a PNG, they can't edit it | You send the .af, they pick up where you left off |
| Editing it six months later | Start over, a different result | Open the source file, change it, done |
| Rights to fonts and photos | Unknown origin, you're vouching for it blind | Your own photos, licensed fonts |
None of this means image generation is useless — for a moodboard, a quick sketch, or a one-off slide-deck visual, it's great. You could even start phase 2 with it: generate three visual directions, pick one, and only then build it properly in a layout tool. The line falls elsewhere: anything you'll ever edit needs a source file. A brochure, a price list, a website, a database — all of it, you'll be editing.
There's a deeper difference, too, in what's left over once the work is done. Generate in a chat window and you end up with a folder of images and a conversation history; build a system and you end up with a repeatable process — the next brochure comes from the same folder, brand voice, and prompts, in a fraction of the time. One path buys outputs, the other builds a capability. For a one-off, that doesn't matter; for a brand meant to outlive this moment, it does.
Alternatives to Affinity
Affinity isn't the only route to a source file, and an honest guide should say so. Good news for a beginner: the tool choice isn't fateful. Brand voice, git, the website, and the CRM stay the same no matter what you lay the brochure out in — only phase 2 swaps out. Since Affinity is free and Canva is free to try too, you can get a feel for both before deciding.
- Canva through MCP. Canva has an official connector for AI assistants: from Claude you can create designs from a description, fill branded templates with content, edit and resize, search the asset library, and export (PDF, PNG, PPTX, and more). The output is an editable design in your Canva account — a source file, not a black box, it just lives in Canva's cloud instead of on your drive. When it's enough: social media, presentations, simpler flyers, materials a team without a designer can polish on their own. Where it falls short: precise typography and print prep — Canva can produce a print PDF with bleed, but full color and layout control to a stricter printer's spec belongs more to Affinity or InDesign. What happens after you send the following prompt: a new design appears in your Canva account, and a link shows up in the conversation — click it, the design opens in Canva's editor, and you can keep working in it by hand too.
Using the Canva connector, create a design for an eight-page brochure
for cafés: colors and fonts per the attached brand-voice.md, copy
from the attached materials, photos I've already uploaded to the
Brochure folder in Canva.
Generate a first version and send me a link to the design — I'll
finish the details right in the Canva editor. Don't rewrite the
copy in your own words, stick to the materials; where copy is
missing, leave a placeholder box with a note.
Once I approve the design, export a print PDF with bleed.
- Adobe Express. Fast, web-based design over templates, with AI features and Adobe-ecosystem ties; a good fit if Adobe already lives at your company. For precise print layout, it's the same league as Canva — fine for simpler things.
- Adobe InDesign. The professional standard for layout. AI enters through prepared templates and data sources (Claude prepares the text and tables, the template holds the layout); typically the path for companies working with a studio who just want to hand over better materials.
Rule of thumb: the closer the output sits to the printer, and the longer it needs to live, the more a full layout tool with a file on disk (Affinity, InDesign) pays off. The faster and more digital the output, the more likely Canva or Express is enough. The common thread across all four: an editable design, not pixels.
Security across the whole process
Security notes were scattered across the phases; here they are together, because as a whole they form a system. A broader framework — what AI may and may not do, and why — sits in the chapter on AI ethics and safety.
- Sensitive materials only in a paid account with contractual data protection. A brand manual, price lists, internal copy — never into an anonymous free chat. For customer data specifically: only what a task actually needs.
- What may go into the repository: brand voice and logos, yes; an internal price list only with caution (and in a private repo); API keys and passwords, never — those belong in .env files covered by .gitignore, and in Vercel's environment variable settings. Git remembers its history: a key that was ever in the repo is a leaked key, even after you delete it — the only fix left is rotating it.
- CRM: customer personal data goes into a Supabase project in the EU region; RLS from the first migration, not added later; the service key stays server-side only, only the anon key covered by policies reaches the browser; sign-in through Supabase Auth, never your own cryptography.
- Website: distinguish server-side from public environment variables; keep preview deploys behind protection, so work-in-progress isn't visible to the whole internet.
- AI drafts, a human approves. Especially for the CRM: the agent reads and suggests, a human approves every write to live data and every email that goes out.
- Have a plan B for a service ending or getting more expensive. This is security too. The setup in this guide is inherently resilient to service outages: your repositories exist locally on disk as well (git is a copy, not just a pointer), the .af file is on disk, SQL migrations describe the whole database, and Supabase data can be exported any time (PostgreSQL is an open standard — you can move it to another provider). All it takes is actually making a backup once in a while: once a quarter, download a database export and confirm you have local copies of your repositories. Ten minutes that turn “we're hoping Vercel lasts forever” into “if anything happens, we can move in a week.”
And every so often, a full review — this is a prompt for a final check before launch, but feel free to make it a quarterly routine. It belongs in Claude Code; here's what happens after you send it: it goes through the repositories' history and settings (a few minutes of work, you'll see progress output) and returns a list of findings ranked from most serious — it won't fix anything on its own:
Do a security review of the whole project before we make anything
public:
1. Go through the git history of the repositories (brand, website,
   crm) and look for anything that looks like a key, password, or
   token — including in old commits
2. Confirm .env files are in .gitignore, and that the Supabase
   service key never makes it into code that runs in the browser
3. List the environment variables set in Vercel and flag which of
   them are public (reach the browser)
4. Confirm preview deploys of the website have protection turned on
Return findings ranked by severity, each with a suggested fix.
Don't fix anything without my approval.
The whole process on one screen
For the moment you go through this guide a second time, hands on the keyboard — a summary of every step, in order, each tagged with the phase where you'll find the details.
- Set up a claude.ai account, get the paid Pro tier, download the desktop app (setup).
- Set up a Canva account, download and install Affinity, connect the Affinity connector in the Claude app (setup).
- Set up a password manager; key accounts on a company email address (setup).
- Gather materials, set up a Project on claude.ai, upload them (phase 1).
- Distill the Brand Voice document, let yourself be interviewed, run the stress test, save
brand-voice.md(phase 1). - Prepare the
brochure-2026folder (photos, price list, copy, brand voice), open Cowork over it (phase 2). - Have a structure proposed, approve it, build spread by spread, proofread from paper, export: .af + print PDF + light PDF (phase 2).
- Set up a GitHub account, turn on two-factor authentication, watch a repository get set up by clicking (phase 3).
- Install Claude Code, run it in the brand folder with a “teaching contract,” set up the
company-brandrepository, check the file list before the commit (phase 3). - Build the website following the website guide; set up Vercel through GitHub, import the repository, first deploy (phase 4).
- Connect the website to brand voice from the repository, go through the copy, buy and connect the domain, turn on preview-deploy protection, switch to the Pro tier (phase 4).
- Set up a Supabase project in the EU region, save the database password, look over the keys in Settings → API (phase 5).
- Have a CRM schema proposed with RLS in the first migration, approve migrations one at a time, run a red team against the test project (phase 5).
- Invite the team through Supabase Auth, deploy a minimal application, migrate data from the spreadsheet (phase 5).
- Set up a Monday agent summary (read-only!), a quarterly security review, and a quarterly subscription check (phase 5 and beyond).
Fifteen lines, six to eight weeks of evenings. Losing the thread halfway through isn't a sign to quit — it's the normal state of week three of any learning process. Go back to the last step that worked; the files and repositories will be waiting.
Common mistakes
- Generating a brochure as an image and calling it done. A month later the price list changes, and you find you have nothing to open. Anything you'll ever edit needs a source file.
- Skipping phase 1 and going straight to the brochure. Without brand voice, you get copy in a generic AI tone — nice-looking, interchangeable, foreign. The document from phase 1 is an hour of work and carries every phase after it.
- Letting copies of brand voice live in three places. In six months they drift apart. One version in git, everything else reads from it.
- Turning on RLS “later.” A database locked down after the fact always has a window where it's open. RLS belongs in the first migration, with a red-team pass right after.
- Committing a key “just for a moment.” Git doesn't forget; a key in the history is a leaked key. Prevention is cheap (.gitignore, a pre-commit check), the fix is expensive (rotating every key).
- Letting the agent write to the CRM because “it saves time.” One incorrectly logged order, or one automatically sent email in the wrong tone, costs more than approval ever saves.
- Clicking through permission dialogs without reading them. Cowork's dialogs and Claude Code's prompts are the one place where “a human approves” actually happens. Anyone who gets into the habit of hitting allow reflexively has canceled the whole security architecture and kept only the feeling of it.
- Setting up key accounts on one person's private email. In a year that person leaves, and the company is stuck queuing for password resets on its own website. A company email, a password manager, two-factor on GitHub — boring, cheap, essential.
- Giving up at the first error message. Red text isn't a verdict; paste it into a conversation and have it explained. The difference between someone “who just isn't cut out for this” and someone who's good at it is usually just that the second person reads the error instead of panicking.
What you get out of it
- Time: a brochure that used to wait weeks now takes days — and updating it takes minutes instead of a new round with a designer. Website copy and follow-ups stop getting written from scratch. Adding it up from the costs chapter: dozens of hours of waiting a year, turned into hours of work the same day.
- Money: fewer one-off jobs for things that repeat (print updates, copy), and you save an expert for where they're genuinely irreplaceable — brand design, photography, a final typographic proofread. Roughly: tools for under a hundred dollars a month against tens of thousands for the external equivalent — exact numbers, and the conditions where this doesn't hold, are in the costs chapter.
- Peace of mind: a database locked down from day one, keys out of the repository, one truth about the brand instead of five copies. Most company AI mishaps are a violation of exactly these boring rules.
- Quality: a consistency that talent can't guarantee but a system can — the brochure, the website, and a customer email all sound like the same company, because they read the same document.
Pro tip
A brand built as a system can watch itself. Set up a scheduled task in Claude — Claude's interface lets you save a brief to run on a schedule, so you write it once and just receive results from then on — that, once a quarter, goes through the company's new copy — recent newsletters, new website pages, follow-up drafts from the CRM — and compares it against brand-voice.md: what's drifting, but maybe legitimately (the brand is evolving — then update the document in git, so the change applies everywhere), and what's just sloppy (then fix the copy). Brand voice stops being last year's document and becomes what it's supposed to be: the most accurate description of how the company talks right now.
And the closing rule of the whole guide: own your source files. Tools will keep changing — connectors, apps, models. The .af file on disk, brand voice in git, SQL migrations, and website code stay yours and stay editable. That's the difference between a company that had AI generate it a few pictures, and a company that built itself a system.
Want to go deeper? The handbook has a whole chapter on it — AI and automation.
Similar tips
Google Calendar from the keyboard: C creates an event, T jumps to today
C
One letter instead of clicking: C for a new event, T for today, D/W/M to switch views, J and K to page through. A question mark shows every shortcut.
Find a time: let the calendar show when everyone's free
Don't arrange a meeting time over email. Google Calendar and Outlook lay attendees' calendars side by side, and you spot the open slot at a glance.
A free booking page: Google Calendar can do what Calendly does
Send a link, the other person picks an open slot themselves, and the meeting lands on both calendars. A built-in Google Calendar feature almost nobody knows about.
Common questions
Why isn't it enough to just generate the brochure directly in ChatGPT or Gemini?
Because what comes out of a chat window is an image — a dead end. A pricing error means generating it again and hoping the rest comes out the same; fonts tend to be approximate, colors inconsistent, and print quality (CMYK, bleed, 300 DPI) is simply missing. A source file in a layout tool you can fix in a minute, and the brand stays consistent.
What is a Brand Voice document, and why put it on GitHub?
A text document that describes the brand's tone, vocabulary, sample phrasing, and forbidden phrases — specific enough that both a human and an AI can write from it. On GitHub it's versioned, accessible to every tool (the website reads it at build time, Cowork reads it when laying out the brochure), and there's a single source of truth instead of five copies scattered across drives.
What is an .af file, and why does it matter?
The native format of the Affinity app — the brochure's source file with all its layers, text, and styles. Unlike a generated image, you can send it to a colleague, open it again in six months, and change the price list without anything else shifting. That's the central argument of this whole approach: the output isn't a black-box image, but an editable asset.
Can I upload a brand manual, price list, and internal materials to an AI?
Into a paid account with contractual data protection, yes — that's exactly what it's for. Internal materials don't belong in an anonymous free chat. And regardless of the account: API keys and passwords never belong in a prompt, and never in a git repository either.
How do you protect customer data in an internal CRM?
Create the Supabase project in the EU region (personal data), turn on Row Level Security from the very first migration — not “we'll add it later” — handle login through Supabase Auth instead of rolling your own cryptography, and keep the service key on the server only; only the anon key, covered by RLS policies, belongs in the browser.
Is an AI agent allowed to write to the CRM on its own?
No. The agent may read and suggest — who hasn't ordered in a while, who should get a follow-up. A human approves every write to live data and every message that goes out. One incorrectly logged order, or one email that sounds off-brand, costs more than the automation ever saves.
How much does the whole system cost per month?
As of August 2026, a starter setup (Claude Pro, Affinity for free, free tiers of Vercel, Supabase, and Brevo, a country-code domain) comes out to roughly $21 a month. Full commercial operation — Vercel Pro, Supabase Pro, paid Brevo — runs about $75 a month; with a Claude Max subscription, over $150 a month. Prices change, so verify current pricing before deciding — a detailed breakdown with sources sits in the costs chapter.
Who is this path not worth it for?
A company where there isn't a single person willing to learn this and own the system. The tools are cheap, but they run on human attention: someone has to approve drafts, guard the keys, and refresh content once in a while. If that person doesn't exist, it's more honest to pay an agency for a one-off job — a half-dead in-house system costs more than no system at all.
Was this helpful?
Liked this tip?
I send one like it every week by email. Two minutes to read, hours saved.
The Top 30 tips e-book, free — it lands in your inbox right away.
Then 1 tip a week · no spam · unsubscribe in one click
Prefer a system to single tips? The free email course — seven days, seven emails, one skill a day.